Thursday, February 24, 2011

Quick & Easy Gift Card Holder


In a pinch for a gift?  We all love gift cards, and giving them seems to be an easy solution when you're not sure what else to do.  The thing I don't like about gift cards however, is the horrible little sleeve you get to put it into.  Nothing screams "I didn't know what to get you" like a plain old GC in the generic sleeve.

Here's my solution.  It takes about 10 minutes from start to finish, and that's if you still have to hum and haw over what paper you're going to us.  Designer paper is great for this - you know exactly what cardstock matches your DSP, so you can throw this little guy together in no time.


 The inside is made of an envelope cut in half.  It holds a nice little note in the first slot, and a gift card in the second.  Presto.  Personalized gift.  You could make a bunch of these ahead of time and just leave the sentiment to add at the last minute to suit your need.


1.  Cut your cardstock into a piece measuring 7 1/2" x 4 3/4."
2.  Score at 1 1/4" and 4 1/2."  Use your bone folder to make the folds crisp. 
3.  Seal an A2 envelope and cut in half vertically (the closing flap should have equal widths on each half).
4.  Using your SNAIL, apply three strips of adhesive down the middle of one side of one of your halves (the vertical way).  Line up the halves and stick together.
5.  Adhere the pockets to the cardstock (the middle section).  Only apply adhesive to the middle section on each side so your holder can flex open (like in the photo above).
6.  Embellish as you please!
7.  To create the flap that keeps your holder closed, apply dimensional stickers to one end of an embellishment.  Apply them just a few mm away from the edge and be generous with the amount you use.  For the card with the white paper I used 5 dimensionals.  It seems like a lot, but you want it to stick!  Alternatively, you can use ribbon (like on the red card) and double-sided tape.

Stamp:  Just Believe (120453)
Paper: Poppy Parade (119793), Sunny Garden (119831)
Ink:  Poppy Parade (119782)
Extras: Envelope (107301), Modern Label Punch (119875), Whisper White Ribbon (109025)

Monday, February 21, 2011

Test Drive Stampin' Up

If you have a passion for paper crafts, Stampin' Up is definitely for you.  As a demonstrator you introduce people to passion, create beautiful projects, and earn free products!  Who doesn't love free stuff?  If you think that becoming a demonstrator might be something that you're interested in, joining during Sale-a-bration is the perfect time.  Not only do you get an additional 15% off the already amazingly priced started kit, ($187 for over $375 worth of product) but you also get $60 worth of free products - including a punch of your choice!  Contact me if you'd like more information.

Not sure you want to commit to becoming a demonstrator?  That's okay too, it's not for everyone.  SAB is the perfect time to test it out.  You get the same amazing deal on the starter kit (plus extra free goodies like a punch of your choice and a colour coach), but there is no obligation for you to ever sell anything, or even buy anything else along the way.  Many people join during SAB just to get the great deal and the free products.

If either of these options seems like something you might be interested in, send me an email (mrslangton@shaw.ca) and I can give you the low down on everything, or check our my Stampin' Up! website.  Test Drive Stampin' Up!

Happy Monday!

Sunday, February 20, 2011

Clearly For You


This morning I woke up to -25 and found myself wishing for spring - again.  As I lay in bed dreading the moment my feet would touch down on the cold floor, visions of my new stamp set danced through my head.  I took the plunge - grabbed my housecoat, put on the coffee, and headed for my craft room.  Here are the results for this morning's efforts.


Clearly For You is from the Occasions Mini Catalogue and is only $21.95.  I've got a few more ideas milling about in my head on how else I'm going to use these stamps today.  The stamps are on quite a small scale, so they're perfect for making cards with.  I love the muted tones of the designer paper.  I think they work perfectly with the stamps, creating a 1920s field guide kind of feeling.


Stamps: Clearly For You (121976)
Paper: Botanical Gazzette (121783), Cherry Cobbler (119685)
Ink: Early Espresso (119670)
Extras: Ribbon - Early Espresso (119964), Brads - (119736)


 This last card was inspired by one made by Mary Fish (stampinpretty.com).  


Stamps: Clearly For You (121976)
Paper: Baja Breeze (111352), Very Vanilla (1016500, Crumb Cake (120953)
Ink: Baja Breeze (111833)
Extras: Hemp Twine (100982)


Friday, February 18, 2011

Birthday Cards

My mother-in-law and cousin both have their birthdays this month so I wanted to make them some special cards.


Donna's card:

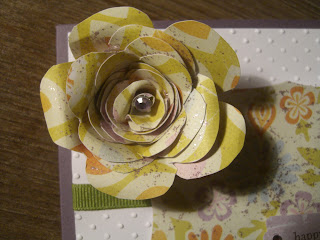
I saw the video for the paper rose on Youtube (love looking at crafting stuff on there) and decided I had to try it out.  It took me quite a while to do this one, but I really like it and think that I'll do it again.  I mixed it with a polka dot texture in the background, and layered a piece of ribbon and patterned paper on top of that.  To finish it off I used the modern label punch and some bling to bring it all together ( I love using rhinestones on my cards).


Amber's card:

"Nature Walk" (#121997) is in the Occasions mini catalogue, and when I saw this bird I knew I had to have it.  There are a bunch of beautiful vintage looking stamps in this set, but this is by far my favourite.  I started with an Early Espresso card and added some layering to get a nice variety of colours.  For the back piece I used Baja Breeze, and layered a piece of textured Crumb Cake on top of that.  I used the First Edition DSP (#121878) on top of a scalloped piece of EE cardstock, and wrapped it with Very Vanilla ribbon.  Both the image and the sentiment are stamped on VV that was stamped with a faint En Francais background (that is THE BEST background stamp.  Ever.).

I like birthday-y cards for kids, but I think it's nice to just add a birthday sentiment to a regular card.  You've got so much more variety this way.  That being said, I think this weekend (I'm blocking Saturday as a full geekin' out day) I am going to make a stack of traditional birthday cards with my "Bring on the Cake" set that seems to be calling to me.

Paper Bag Album


I put my new Crop-a-dile to good use last weekend making a birthday gift for my favourite cousin.  After watching about a hundred Youtube videos on paper bag albums, I decided that I didn't like any of their ideas and figured I could put my new toy to use.  Figures I was right!  I used 4 paper bags and the Sunny Garden designer series paper.  It ended up taking me about three hours to do since it was my first one and I wasn't sure exactly what I wanted, but it was worth the time.


Love the ribbon scrunchie thing...  Works with skinny ribbon just as well as the thicker stuff.  Both the butterfly and the Bliss sentiment are from the "Bliss" set.


These little ribbon flowers (right page) are super easy to make, and super cute.  (See techniques page for a how-to)

The paper bag thing is neat because you can add little notes or extra photos on little tags that slide in and out of the open-ended "pages."


The designer paper series was great to use because they're all designed to go together, and they're double-sided.  I didn't have to worry about over-using any of the patterns, or trying to find enough that would work well together.

I also tried out my heat tool and some clear embossing powder on some plain cardstock (yellow page).  I think the result is really stunning, but also very simple.  The stamp I used for the background is also from the Bliss set that you can earn free during Sale-a-bration.  I used the Stamp-a-ma-jig to line them up evenly.  What a great little tool!  This was also in the box of goodies I got recently that I had been waiting to try out.  It's about $15 and well worth it if you have to have everything lined up perfectly (like I do).

Tuesday, February 8, 2011

Sale-a-bration

Sale-a-bration is Stampin' Up's annual event during which you can earn free products.  For every $60 worth of product that you purchase, you earn a free set of stamps worth $17.95.  You can choose from a wide variety of sets to add to your collection.  These sets are not available for sale, you can only get them through SAB.

SAB also offers a great deal to anyone who signs up as a demonstrator during this event.  You would get the starter kit for 15% off ($187.00 for about $375 worth of product) as well as a goodie package with a free punch of your choice, colour coach, and set of Simply Sent cards free.  You're not under ANY obligation to actually sell Stampin' Up product if you don't feel like it.  Many people sign up just to get the amazing deal offered by the starter kit.  If you're interested in joining, send me a note and I can give you all the goods.

You can order through my store on the SU! webite, but if you place your order directly though me, I will take care of the shipping costs (10% of your order).  All other rewards work in conjunction with SAB.

Monday, February 7, 2011

My Stampin' Up Website

Yay!  My SU! site is up and running.  If you want to shop online, click HERE to access my store.  If you want to get the 10% discount however, you'll have to place your order directly though me.

Happy browsing!

LOVING Stampin' Up!

Let me start by saying I've been a pretty shoddy blogger.  I started this whole thing so people can look at what I'm doing with SU!, and then I didn't really do much with it.  Leave it to my very bestest friend to tell me that she posted the link to this site on her FB page.  Now I guess I have to keep it up.

The first round of open houses was great.  It was great to see the different styles that emerged from everyone.  No one copied my card exactly, so I guess the creative juices were flowing - yay!

I received my starter package last week and have been madly crafting pretty much every day since then.  Okay, not pretty much.  Every day.  And night.  And afternoon.  Actually, it's completely taken over my life.  I didn't even leave my crafting room all day on Saturday other than to use the bathroom, and to make tea.  I rush home from work so I can get back in here.  When I'm lying in bed at night trying to sleep, new layouts and colour combinations fill my head.  It's a little ridiculous to be honest.

As soon as I remember to get some batteries for my camera (or steal them out of one my husband's remotes) I'll post some pictures of a few things that I've been working on.

UPDATE:  I am in LOVE with this ribbon technique.  This was a piece of flat 5/8" ribbon, about 12" long.  Basically, you cut down into the middle of the ribbon (on the short side) about 1/4", and try and separate about 3 of the threads.  Then you pull these and smush the rest of the ribbon down until it starts to bunch up.  Then you smush it down some more, and keep pulling.  If you google "scrunchy ribbon" you can find some videos to show you how to do this (I'm not that hard core into blogging - yet). This makes your cards look really fancy with relatively little work.  It takes a few tries to get good at it, and sometimes you pull threads that just don't want to work for you, but keep at it.  The result is well worth the work.

For this card I used the "Always" stamp set for the bird as well as the backgrounds on both pieces of matting, Perfect Plum ink and cardstock, and Very Vanilla cardstock and ribbon.  To texture the paper I used the square lattice texture plate.

Somewhere on here I will post a calendar of sorts to let people know when my next club will be.  I'm running 2 right now, but they're both full, so I guess it's time to start a new one.  If you're interested in joining on, please email me and let me know.  Then I can figure out what day of the week works best and blah blah blah.

Happy stamping for now!